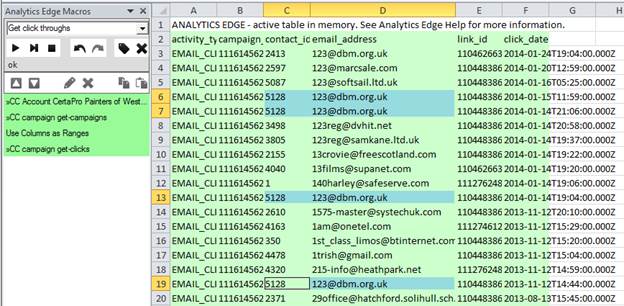
 In a follow-up to Downloading Constant Contact Click-Through Data, this article shows how Analytics Edge can easily turn the raw downloaded data into meaningful analytics without a lot of work or confusing formulas. Looking at the raw download, we notice several things that need to be dealt with: the dates are in a strange format, it contains multiple clicks to the same link from the same person, and the links themselves are identified only by a meaningless link id number.
In the previous article, we used the Analytics Edge Column – Convert wizard to change the date column into to a local date/time in Excel format. In this post, to deal with the duplication of clicks, we will use the Table – Duplicates wizard, and to look up the real web link from the link id we will use the Multiple – Combine wizard.
In every analysis, there are usually a few data preparation steps you need to take. With plain old Excel, you would manually manipulate the columns, write intermediate formulas, and rearrange a few things. With Analytics Edge, all those little steps can be automated using simple wizard functions, making future updates effortless.
 Removing duplicate click events

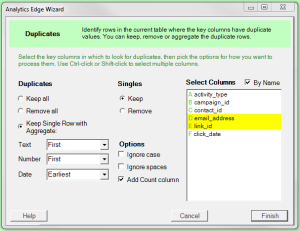
The Table – Duplicates wizard gives us a number of really useful options, but what we want in this case is simply to combine rows where the email address and link id are the same.
Since we have specifically named columns, check the box to select the columns By Name
and then select the two columns. To get the second selection, hold the Ctrl-key down when clicking.
Set the options for handling duplicates for Text (select First), Number (select First) and Date (select Earliest). This will result in rows with the date/time of the first click on the link. The rest of the columns will have the same values in the duplicate rows, so selecting the First value is fine.
Check the box to Add Count column, so we can see how many times that person clicked the link.
 Save this spot

In order to convert the link id numbers into the actual link web addresses, we will need to go get that cross reference list. Since we have an analysis in-progress, we need to save this spot, and we do that by using the Table – Table Name wizard to assign a name to the current data.
 Getting campaign links

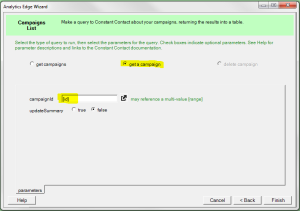
To get the actual web links for a specific campaign, we need to use the Constant Contact connector’s Campaign – get a campaign query.
Working from the previous post’s macro, we had already assigned the campaign id column to a range name, so we can enter “[id]” for the campaign id field and it will inherit the value from the previous macro step.
 Rearranging the data

The result may be a little unexpected. Analytics Edge processes the results of the query into a single row for the campaign, but there may be multiple web links in the campaign. To handle this situation, second and third and fourth links are added as separate columns with -1, -2, -3 extensions to the column names (e.g. url, url-1, url-2, url-3).
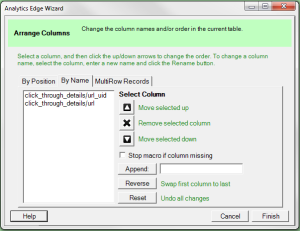
To get the web links on multiple rows suitable for a lookup table, the Analytics Edge Table – Arrange wizard provides a MultiRow Records conversion. This merges all of the -1, -2, -3 columns into a single column with the common part of the column name (e.g. url).
 Keep only the columns of interest

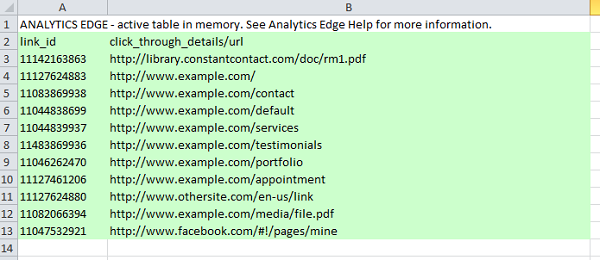
Even with the consolidation of columns, the campaign detail query returns over 40 different columns. Since we only need a couple – the link id (click_through_details/url_uid) and link url (click_through_details/url), we use the Table – Arrange wizard again, and keep only those two columns, selected By Name.
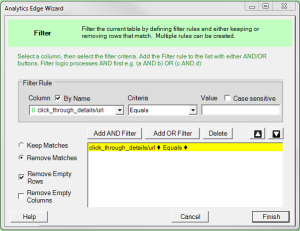 Removing empty rows

In some cases, it is possible that the MultiRow rearrangement will generate more rows than there are links in the message, if it was sent to a long series of lists for example. To be safe, we should include a step that removes any of these empty rows from our little table – a simple Table – Filter wizard will do the trick.
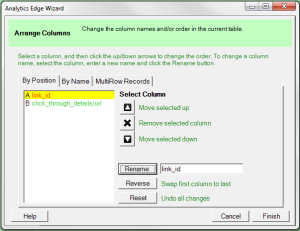 Matching link_id column names

In the last step to prepare our lookup table, we need to make the name of the link id column match the same column from our click through query — “link_id”. We use the Arrange wizard one more time for this, on the By Position tab, selecting the id column and entering a new name for the column.
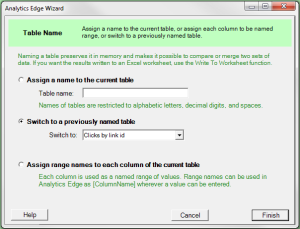
Name this reference table
Now that we have a nice reference table for campaign lookups, we can use the Table – Table Name wizard to give it a name for reference (e.g. “Link lookup“).
 Back to our previous work

Using the Table – Table Name wizard again, we can switch back to that spot we saved earlier – “Click by link id”.
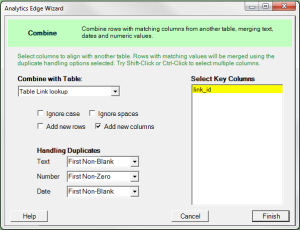 Combine the tables

Using the Multiple – Combine wizard, we can now add a web link column to our click data. We select the Link lookup table, and the link_id key column, check the box to Add new columns and set the options for handling duplicates (which we don’t expect).
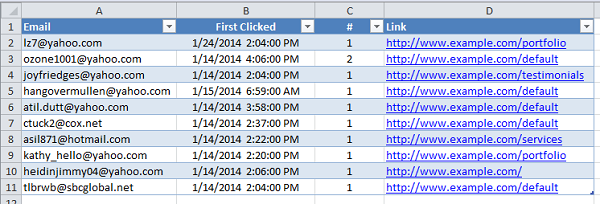
Now we have the final piece of information we were looking for and all we have to do is write out the columns we want in the order we want.
 Final prep steps

Three simple steps to report-complete: use the Table – Arrange wizard, By Name, to select the specific columns was want to display.
Use the Table – Arrange wizard, By Position, to rename the columns to report-friendly titles.
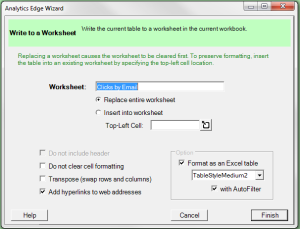
And finally the File – Write Worksheet wizard to put the results into the worksheet for presentation.
Summary
Now that these simple steps have been recorded once, refreshing the report is as easy as running the macro. There aren’t any manual steps to remember, no formulas to try to figure out, and nothing to download. The whole process can be performed without taking your mind off your work, and you can spend more time adding value with observations, insight and recommendations.
Analytics Edge lets you focus on your work, not the tool.