If you manage several large websites, the Analytics Edge Add-in allows you to build an efficient template for separating branded and non-branded search queries from the Google Search connector.
Overview
The sample workbook attached below includes a setup worksheet where you would enter the account and website to be used, as well as a regular expression for the brand filter. The Analytics Edge macro performs the following steps:
 Reads the brand regular expression from the ‘setup’ worksheet
- Run a query from the Google Search connector
- names the table of results ‘all’
- filter to keep by the brand regular expression
- Writes the results to the ‘branded queries’ worksheet
- reloads the table ‘all’ in memory
- filter to remove by the brand regular expression
- Writes the results to the ‘non-branded queries’ worksheet
GoogleSearch-branded-vs-nonbranded-template-v10.xlsx
The Setup

Three pieces of information are used in this example: the account, the website, and a regular expression to be used to get branded search terms. It is all placed on a setup worksheet so it is available in one place, and it can easily be hidden in Excel so it is not immediately visible to others (like clients).
account: The account needs to be the reference name you used in the Google Search connector’s Accounts wizard.
website: Enter the website as it appears in the list of sites available in your account., complete with the http or https prefix.
brand regex filter: enter a regular expression that will be used to extract branded queries from the results. Note that if the expression starts with a non-alpha character, you may need to prefix it with a single quote ( ‘ ) for Excel to accept it as a text string.
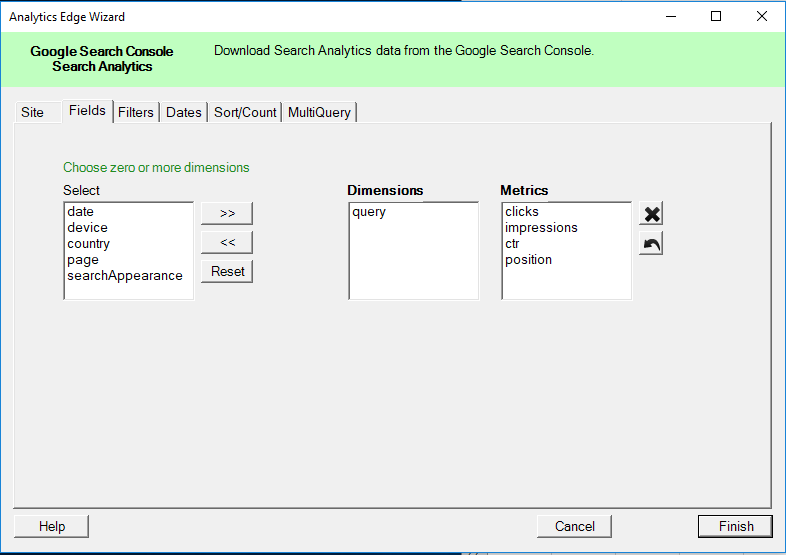
The Query
The Google Search query is configured to grab the ‘query’ dimension and all 4 metrics for web queries in the last calendar month. You can modify the filter to include country filters, or restrict to desktop or mobile devices. You can also modify the date range selected.
Option: you could also extend the template by setting worksheet cell references for the start and end dates to cells in the ‘setup’ worksheet. By relying on ‘last calendar month’, though, the workbook could be refreshed on a schedule without requiring any input.
The Filter Magic
At the start of the macro, a Read Worksheet function is used to grab the filter expression from a worksheet cell. This is done by reading a specific range of cells (one). Check the option that the data (selected cell) does not include a header (no title cell above the data). Also check the option that you want the macro to automatically assign a range name to the columns in the results.

Does not include header: This combination of options loads the single cell into memory, and since there was no header, it assigns the column a default name of ‘Col A’.
Assign range name to each column: When assigning ranges names to the columns, the add-in holds the values which can be substituted elsewhere in the macro simply by referencing ‘[Col A]’.

In the Filter functions later in the macro, we can use this range name as a variable — the actual value from the worksheet cell will replace the ‘[Col A]’ when the filter command is run.

Table Names in Memory
 The macro makes use of a table name and switches to a table, which may seem a bit confusing. If we look at what happens at each step in the macro — the ‘flow’ — we can see the data that the add-in is working with changes with each function.
Step: You can step through the macro by clicking the ‘step’ button in the task pane, and it will advanced one function at a time, showing you a sample of the data that it is working with in a green temporary worksheet.
Table Name: When you ‘name’ a table, the add-in makes a copy of it. When you switch to a named table, you drop the data currently in memory and reload the copy of the table you made earlier.
Working With Large Websites
Minimize Large Queries: The macro uses this save-a-named-table approach because it only requires one query, and queries for large websites can be slow. We need to filter the results in two different ways, and using a named table saves us from having to run the query a second time. Moving stuff around in memory is really fast.
Separate Queries From Analysis: When building reports that analyze data from large sites, it is often a good idea to create a macro that downloads the data into the workbook, then use other macros to perform the analysis. This makes it easier to work on or change an analysis macro without repeating the big downloads. You can now create other macros to analyse the differences between branded and non-branded queries.
Mind Your Rows and Columns: some of the macro functions can cause the add-in to try to read the ‘used range’ of a worksheet, so if you have a lot of rows and a lot of columns being used, even if there is not a lot of data in those rows and columns, the add-in will try to create a massive table to load the contents of the worksheet…and you will get a memory error. Put large result sets on their own worksheets, and position them starting at cell A1, and you shouldn’t run into any problems.